-
Why Use Eventleaf for Eventbrite Check In?
Not only is Eventleaf simple, economical and user friendly event management software, it also sports the full range of features you might expect from a check in app for Eventbrite events. Features such as:
- Self Check In: Easily enable Eventbrite self check in using the Eventleaf event check-in app. Attendees look up their names or scan the QR code in their confirmation email to check themselves in to the event.
- QR Code Check In: Speed up the check in process by asking attendees to scan their Eventbrite QR code with Eventleaf Check In App. You can enable Eventbrite QR code check in within seconds.
- Attendee Engagement: If you want, you can also use the Eventleaf event app to let your Eventbrite attendees view event info, interact with other attendees and speakers, participate in live Q&A, and respond to live polls.
- Print Attendees Badges: Design a badge or your Eventbrite event using Eventleaf.com. Print attendee badges at the main door or just ask your attendees to download the Eventleaf event app and use a built-in digital badge.
- Monitoring and Reporting: Access Eventleaf's robust tracking and reporting features and view all critical metrics for your Eventbrite event, such as registrations, check ins, check outs, payments, time logs, poll responses, leads and more.
-
How to Use Eventleaf for Eventbrite Check In
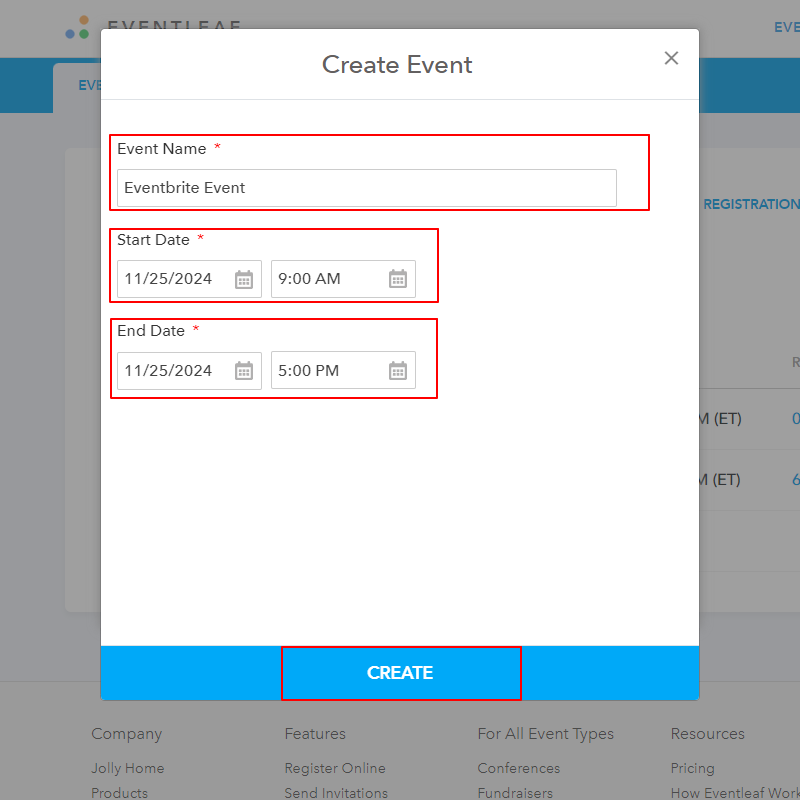
1. Create an Event in Eventleaf
- Log into your Eventleaf Account. If you don't have one, sign up-it's quick!
- Create a new event by clicking plus (+) sign.
- You can set the same date and time as those of your Eventbrite event. Click on
CREATE.
-
2. Import Event Data from Eventbrite (Optional)
- You don't need to complete all the details such as Event Description, Agenda, Sessions, Speakers, Exhibitors, Sponsors, Hotels etc, but completing them will allow your attendees to access and interact with your event using the Eventleaf Guide app.
- Exporting Event Data from Eventbrite: You can export all of the above details from Eventbrite into files. To do so, click on Orders in the Manage Attendees section of your Eventbrite dashboard. Select Export to CSV in the EXPORT menu.
- Once you have your Eventbrite event data saved nicely as CSV files, you can import it into
Eventleaf. To import the Sessions,
Speakers and Exhibitors, select the relevant tab in your Eventleaf dashboard
and
click on IMPORT.
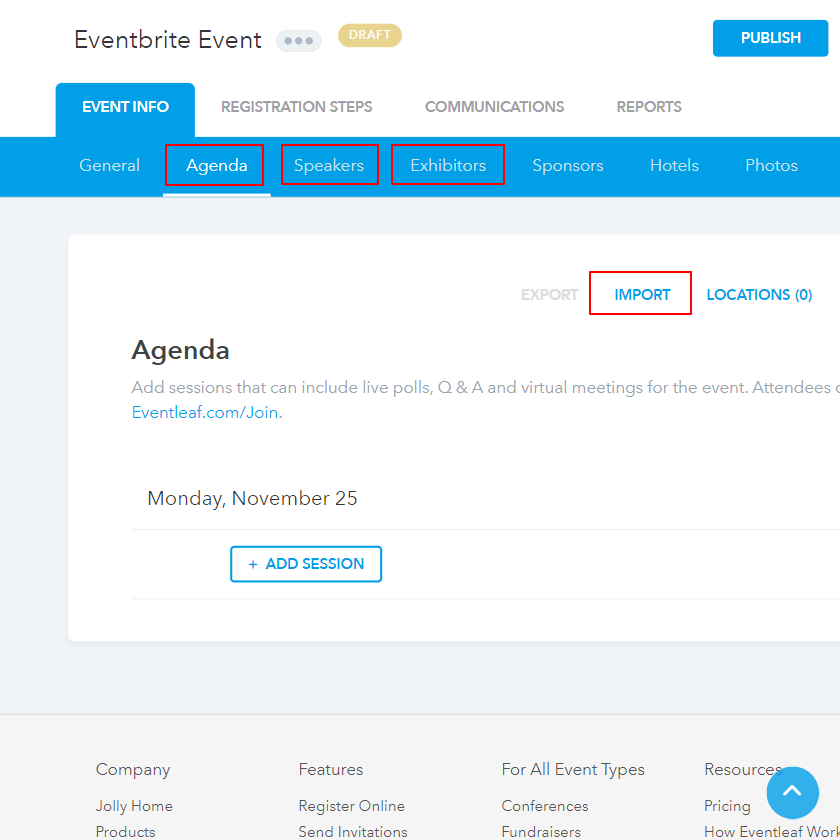
- After you have filled out the details that you want your attendees to view via the Guide App, click on PUBLISH to activate your event.
-
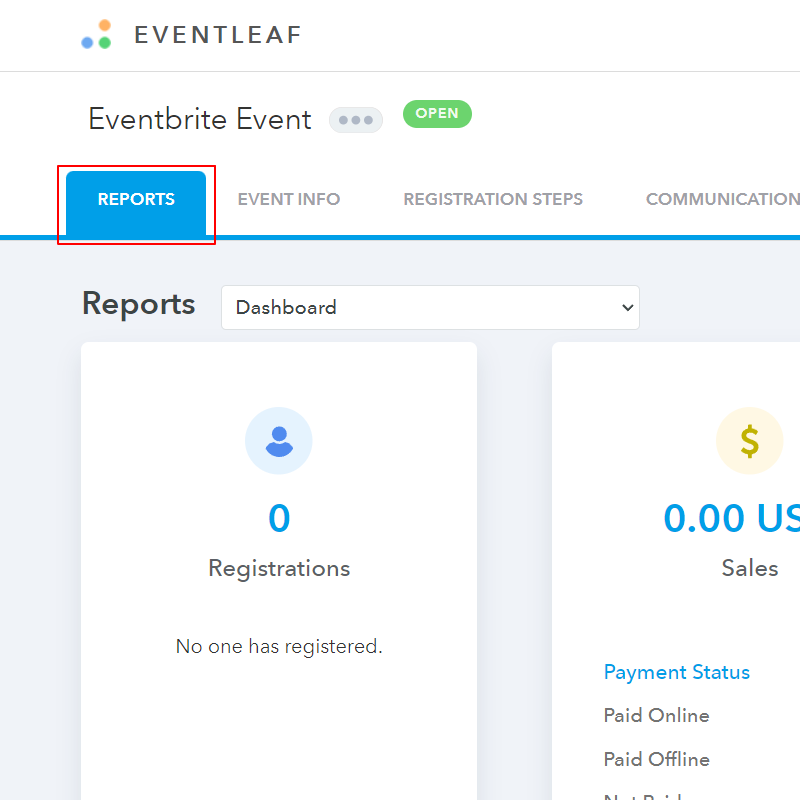
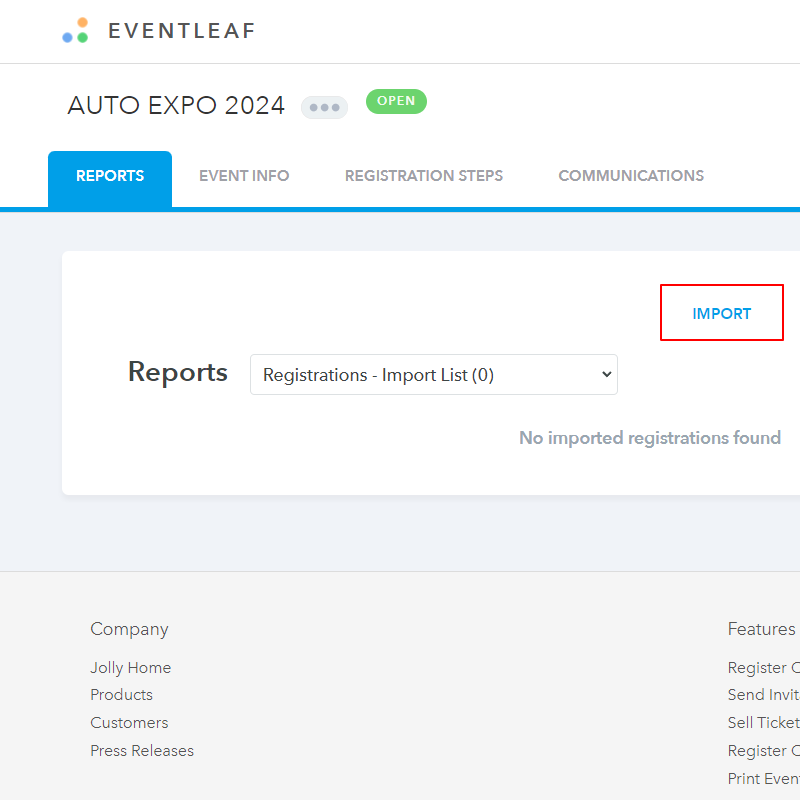
3. Import Attendees into Eventleaf
- Select your event and click on REPORTS.
- From the drop-down dashboard, select Registrations - Import List.
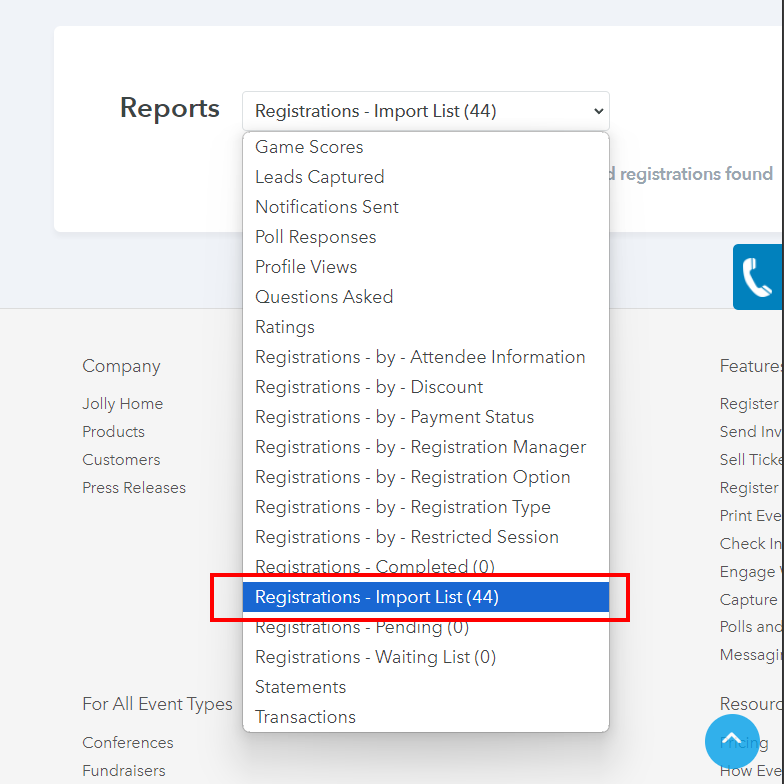
- Click on IMPORT and follow the instructions that appear on the next page.
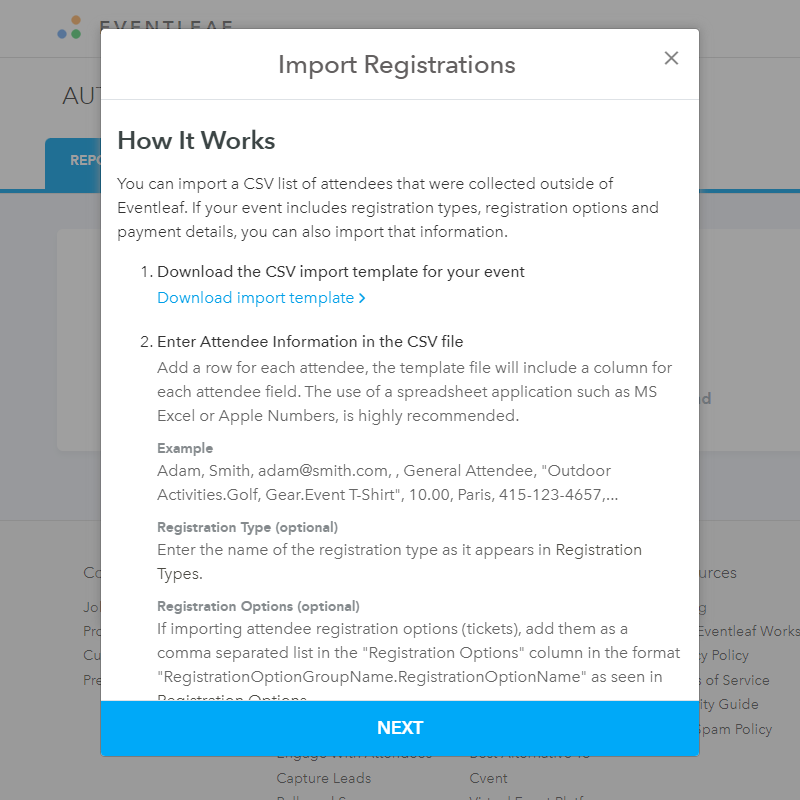
- Check that the Eventbrite CSV file is in the proper format according to the given instructions.
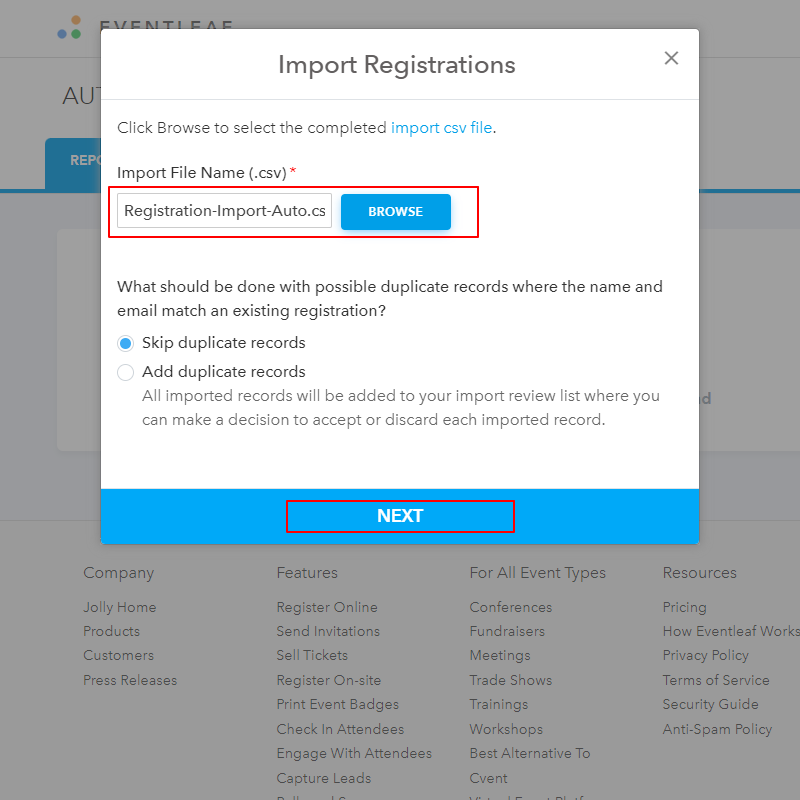
- Upload the CSV file in the proper format according to the instructions. Select if you'd like
Eventleaf to skip duplicate records
or add them to your import review, where you'll be able to accept or discard them. Click
NEXT.
- Eventleaf shows you a review of the imported restrictions to check if everything is correctly imported. Check and import review and complete the importation.
- Select your event and click on REPORTS.
-
4. Set Up the Check-In App
- Download the Eventleaf Check-In App. It's available for iOS, Android and Windows.
- Log in using your Eventleaf credentials and select your event from the list.
- You'll be taken to the Check In screen where you can search for attendees' names or scan
their
Eventbrite QR codes and check
them in one by one.

-
5. Enabling Eventbrite Self Check In
You can easily set up the Eventleaf mobile app in kiosk mode and allow Eventbrite attendees to check themselves in or out. This would reduce the need for staff at the entry points and speed up the check-in process. Here's how to set it up:
- Tap on the menu on top left of the screen, then tap on Settings.
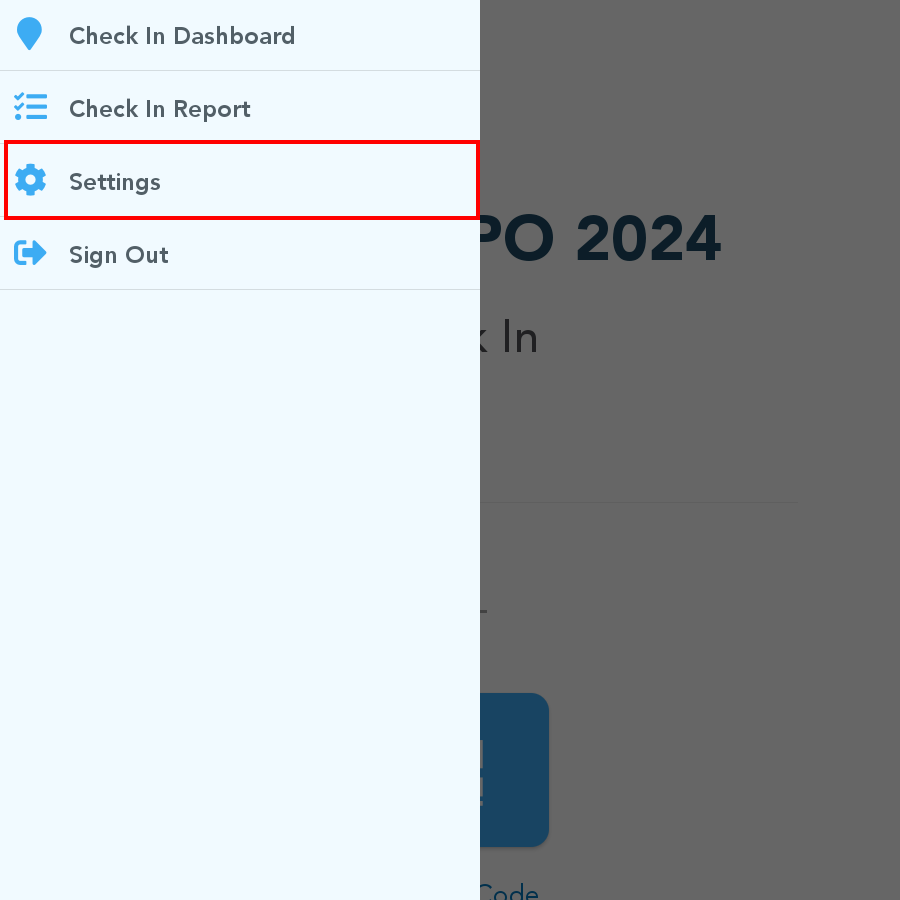
- Select the event and session for which you want to enable attendee self check in. Click on Usage Mode.
- On the next page, scroll down to Attendee Self Check In Kiosk. Click on SELECT.
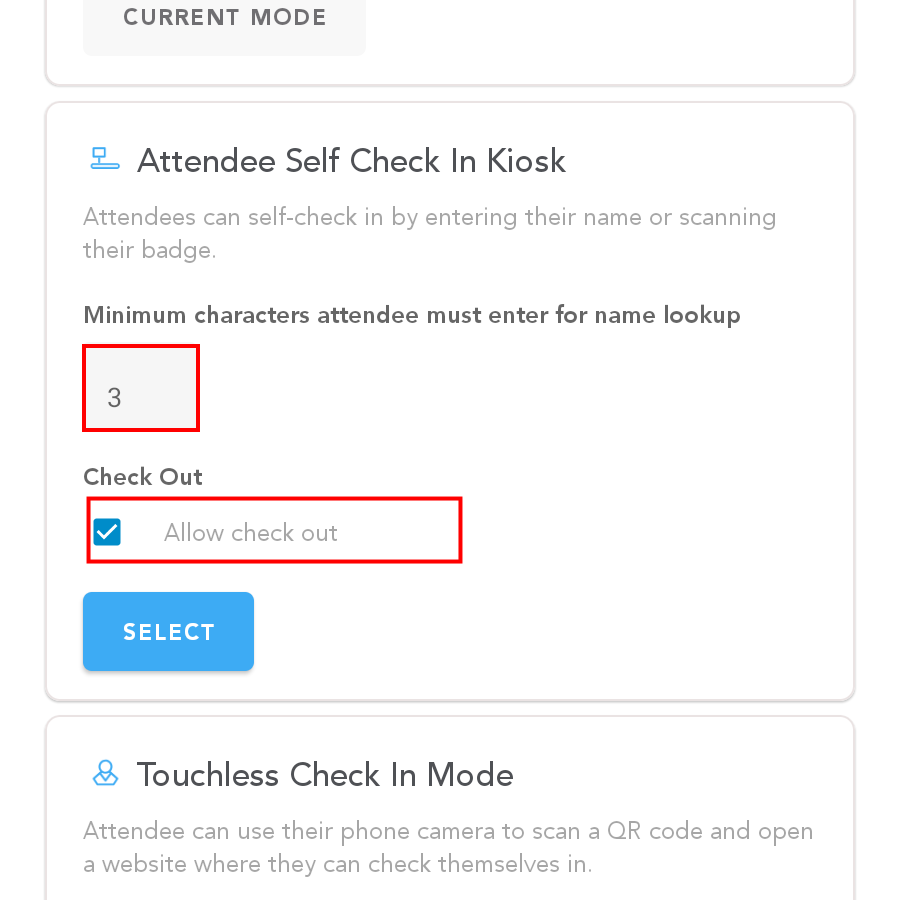
- The Eventbrite Self Check In/Out is now enabled. The prompt "Enter your name" will appear on
the
check-in screen.

- Tap on the menu on top left of the screen, then tap on Settings.
-
6. Printing Eventbrite Attendee Badges
To print Eventbrite badges with Eventleaf event management platform, design the badge in Eventleaf.com and use a wireless printer to print out attendee badges at the venue. Click here to view a step-by-step guide on how to print attendee badges.
-
7. Digital Badging with Eventleaf Guide App
While physical badges have their charm, why not leverage technology and save some trees? The Eventleaf Guide App offers a digital badge for every attendee.
- Ask your attendees to download the Eventleaf Guide App. Share the link prior to the event.
- They can log in using their registration details.
Their digital badge is ready. They can show it for entry or for verification during sessions.
-
Wrapping Up
It might have seemed like a mammoth task initially, but with Eventleaf event management platform, seamlessly transitioning from Eventbrite becomes a walk in the park. So, while you started your event journey with Eventbrite, with the Eventleaf integration, you can ensure your event culminates in success. Checking in attendees, managing sessions, or printing badges becomes a no brainer with Eventleaf!
-
Related Links
How to Check In and Out Attendees Using the Check In App
How to Print Attendee Badges Using Eventleaf Check In App